
Now that summer is coming to an end here in the UK, it’s time to look back at some more exciting features introduced by MuleSoft over the last few months. So in saying that, welcome to the 9th blog in the series on Anypoint Code Builder!
This release introduces several features that were previously unavailable, including a major improvement in MUnit testing (spoiler: instead of manually editing XML files to write tests for flows, you can now edit these via the user interface!) as well as new AI-powered features, which are exclusively available through Anypoint Code Builder.
In this article, I will cover the following topics:
- How to design API specs with AI,
- Creating a MUnit test from a flow,
- Navigating to Flows from Connectors,
- How to comment out Components in Canvas.
But before we dive into it, if you want to catch up on some of the more recent blogs in the series, you can check them out here:
- Building with Agentforce in Anypoint Code Builder
- October 2024 Anypoint Code Builder Release
- Summer 2024 Anypoint Code Builder Release
Now let's go!
How to design API specs with AI
We’ll begin with our good ol' ‘Hello World’ project that we’ve referenced in previous blogs. This time, however, we’ll start by exploring the ‘Designing API Specs with AI’ feature from scratch. After opening VS Code, simply click on the MuleSoft plugin and select Design an API to get started.
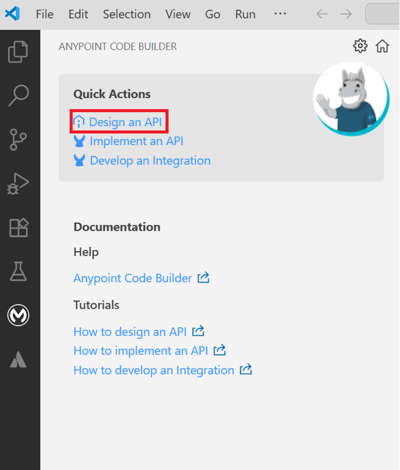
Choosing 'design an API' in the VS Code interface
Next, we select the project name, business group name, and API specification language. Then, we click Create Project.
 Ready to create a project
We can see the project is now created. After clicking the Agentforce icon in the top right corner, we now see two options: Create API Spec and Create Flow Integration. We will choose the first option - Create API Spec.
 Example showing how to create an API spec
I then wrote the prompt below to create basic API specs - with a path called messages, a GET method that returns a 200 OK response, and a JSON object.
 Close up of creating a rest API spec
Then I copied the generated specs into our project, as shown below, and selected Implement this local API from the top right corner. Please note that we also have the option to publish the API to Exchange (highlighted in red) and test the API specs in the API console (highlighted in blue).
 Dashboard showing how to implementing the local API
We then need to click OK to approve the project scaffolding.

Close up of approving the project scaffolding
Next, we will have a series of actions we need to do, such as selecting the target folder for our API and the runtime version. Afterward, we should see the project being created for us in the workspace, as shown below.

 Dashboards showing where to select the right target folder
We can now go ahead and implement our API. This is a very handy feature offered by Anypoint Code Builder, which isn’t actually available in the Design Center on Anypoint Platform. We can also test the API without having to publish it to Exchange. Let’s now check out another feature!
Creating a MUnit test from a flow
Now, we will move on to a feature that allows us to create a MUnit test from a flow. I will also demonstrate how to create a simple test case. But before we begin, I have prepared a simple flow that includes a ‘Transform Message’ component with a payload set to the following JSON object: {"message": "hello world"}.
To create a test case, right-click the flow name and select Create Test.
 Example showing how to create a test
Now we can see the skeleton of the test that has been created for us, which includes Behaviour, Execution, and Validation sections. In the Execution section, we can see a reference to our flow.
 Dashboard showing the reference to our flow
We will move forward and create a very basic test. In the Validation section, we will add an Assert Equal component. Inside it, we will check whether the payload is not null. We will then run the test by clicking on the highlighted icon.
 Seeing our flow in the validation section
We can see the test run was successful.
 Close up example of a successful test
And for anyone interested, here is the list of the components to be selected from MUnit Module that you can use to make your MUnits, that are now available to be configured from the user interface.
 List showing all the components
Navigating to Flows from Connectors
We can now navigate to the flow from the connectors. To do this, simply click on the referenced flow and then select Go to Flow.
 Dashboard showing how to navigate to the Flow section
Comment out Components in Canvas
We also have the option to disable components in a flow. To do this, simply click on the component you want to disable and then select Disable Component.

 Dashboard showing how to disable components
Wrap up
And that concludes this blog! This release of Anypoint Code Builder delivers a real step forward in both productivity and usability. From designing API specs with AI to creating MUnit tests directly from flows, these features are all about making life easier for developers and helping teams build faster, with fewer manual steps. The added ability to navigate between flows and connectors, and even comment out components in the canvas, shows how MuleSoft continues to refine the developer experience in meaningful ways.
If you’d like to dive deeper into all the features introduced since July 2025, you can catch up on the full list here. And don’t miss the next blog in this series, where I'll take a look at using AI to map fields in DataWeave expressions and generate DataWeave transformations inside Anypoint Code Builder.
See you then!

.png)
