Originally posted on Another Integration Blog.
This is the first of a series of tutorials demonstrating how you can play and learn Flex Gateway using minikube.
Well, minikube is an excellent tool for learning and e K8s environment: it's light, it can run on Docker and you can deploy a cluster on your laptop using a few resources.
In this series, let's learn together the key points of installing and deploying Flex Gateway — Connected Mode on a K8s environment, covering most of the required aspects as expected for a production-ready environment:
- Installation, High-Availability & Autoscaling
- Persistent storage — REDIS
- Configuring SSL certificates for HTTPs
- Deploying APIs and applying policies
- Configuring advanced routes
- Externalising logs
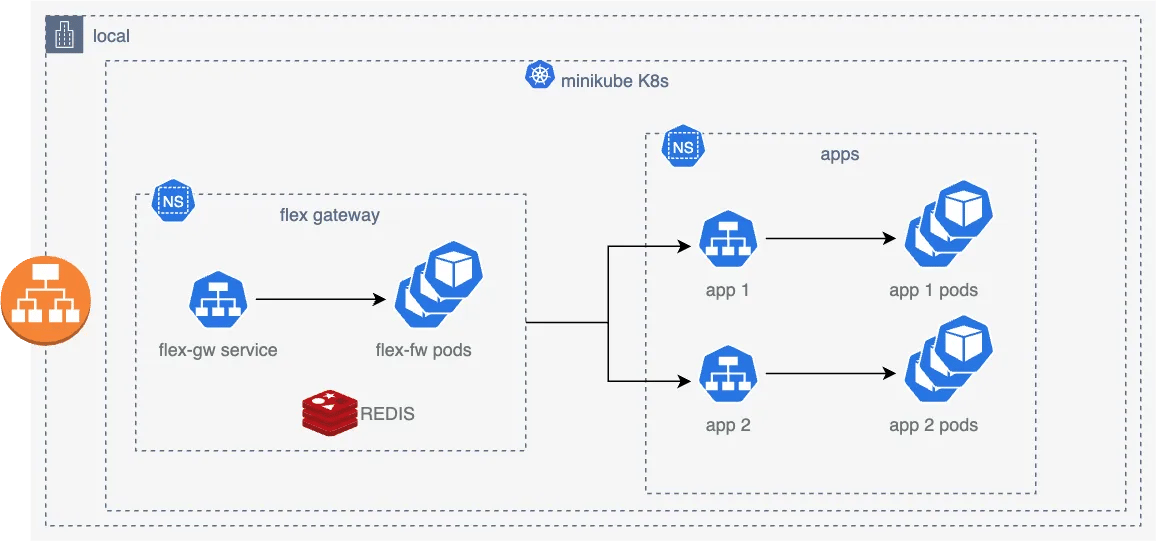
High-level overview
Installing minikube
- Install minikube: https://minikube.sigs.k8s.io/docs/start/
- Install kubectl: https://kubernetes.io/docs/tasks/tools/#kubectl
- Install docker: https://docs.docker.com/desktop/
If you are running it in a Mac M1 or M2 environment, try Docker 4.26.1 version and enable Rosetta emulation in Docker settings. I've faced some issues running on Docker 4.28.0 while writing this article.
Let's start initialising our minikube environment. For this, let's also use a profile that will make it really easy to spin up multiple k8s environments in your local:
% minikube start -p flex-gw-bootcamp

....

🏄  Done! kubectl is now configured to use "flex-gw-bootcamp" cluster and "default" namespace by default
You can have as many profiles as you want. Each profile will have its individual cluster configurations, so you can have one for playing with Flex Gateway, another for playing with your preferred programming language, another only for K8s studies and so on…
If you see the successful message above, you are fine to move forward and let's enable some metrics features in our cluster:
% minikube -p flex-gw-bootcamp addons enable metrics-server
The metrics features will provide insights from the pods deployed on the cluster, such as CPU and memory usage, and allow us to configure autoscaling capability later.
At this stage, we have an operational K8s environment running in our local environment and let's see how we can interact with it using two main features:
- Dashboard — This dashboard allows you to interact directly with the cluster by creating, updating or deleting resources and viewing metrics, logs, etc.
- Tunnel — Create a bridge between your local environment and the minikube cluster to allow you to access the services deployed in the cluster.
The following commands should be executed in different terminal sessions, and you must keep them active while using it.
Dashboard
% minikube dashboard -p flex-gw-bootcamp

....
🎉 Opening http://127.0.0.1:63721/api/v1/namespaces/kubernetes-dashboard/services/http:kubernetes-dashboard:/proxy/ in your default browser...
After executing the command, the dashboard will automatically open in your browser:

Tunnel
% minikube tunnel --cleanup -p flex-gw-bootcamp
Depending on your environment, this command can require your password.
We will see more about tunnels while deploying and interacting with APIs.
Installing Flex Gateway
Install Flex Gateway using the instructions provided here: https://docs.mulesoft.com/gateway/latest/flex-gateway-k8-getting-started
By the end of the installation, you will see the Flex Gateway connected in the Runtime Manager:
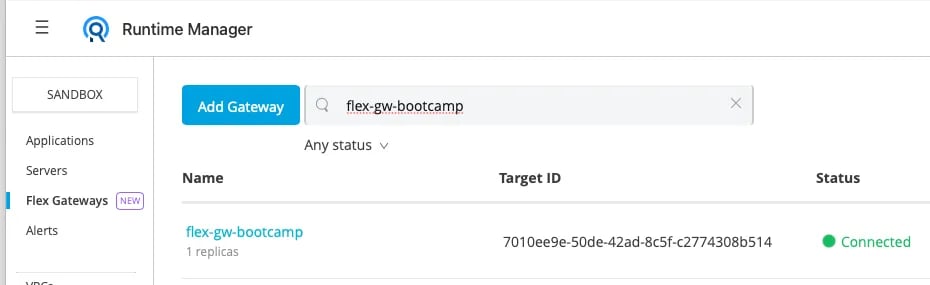
Runtime Manager - Flex Gateway Status
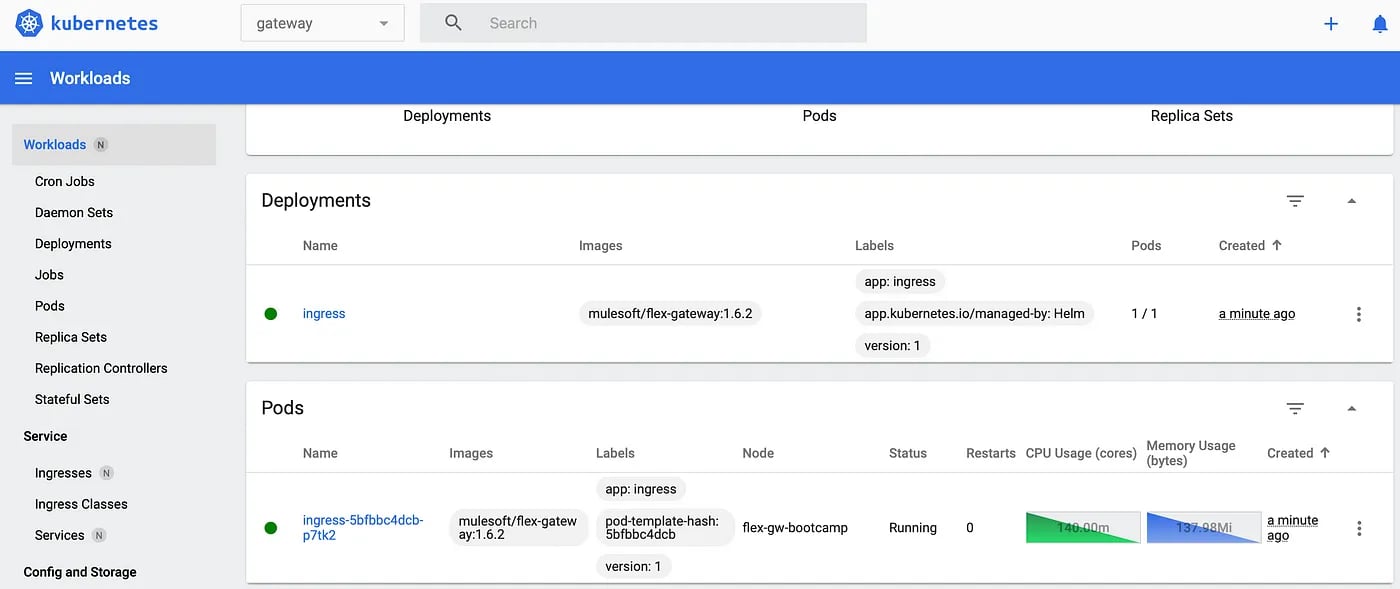
You can also confirm it’s up and running by executing a kubectl command to get the service details or checking the minikube dashboard:
% kubectl get service -n gateway
...
NAME      TYPE           CLUSTER-IP       EXTERNAL-IP   PORT(S)                      AGE
ingress   LoadBalancer   10.103.199.201   127.0.0.1     80:30769/TCP,443:31560/TCP   6m14s
Enabling multiple replicas
By default, the Flex Gateway installation will deploy a single replica. Let's start customising our installation by adding a new replica to Flex Gateway and configuring a HA environment.
% helm -n gateway upgrade \
ingress flex-gateway/flex-gateway \
--reuse-values \
--set replicaCount=2

...
Release "ingress" has been upgraded. Happy Helming!
NAME: ingress
LAST DEPLOYED: Thu Mar 21 16:16:22 2024
NAMESPACE: gateway
STATUS: deployed
REVISION: 2
TEST SUITE: None
We can check our Flex Gateway running with multiple replicas using:
% kubectl get pods -n gateway

...
NAME                       READY   STATUS    RESTARTS   AGE
ingress-7c97fd7469-vfd8t   1/1     Running   0          95s
ingress-7c97fd7469-zt6vt   1/1     Running   0          96s
Enabling Autoscaling
We can use HPA (Horizontal Pod Autoscaler) to enable our Flex Gateway service to spin up new replicas accordingly with metrics like CPU and memory usage. This will allow us to scale up when the traffic is high and scale down once the usage is lower.
Ensure you have enabled the metrics server feature in minikube before configuring autoscaling.
Download the autoscaling.yaml file and apply it using the following command:
% helm -n gateway upgrade \
ingress flex-gateway/flex-gateway \
--reuse-values \
-f autoscaling.yaml
Check your autoscaling configuration using the following command:
% kubectl get hpa -n gateway

...

NAME      REFERENCE            TARGETS            MINPODS   MAXPODS   REPLICAS   AGE
ingress   Deployment/ingress   27%/75%, 12%/75%   2         11        2          2m46s
You can check all parameters available for HPA on this link: https://docs.mulesoft.com/gateway/latest/flex-gateway-k8-high-availability#autoscaling-parameters
In the following article, we will work on a practical to use and customise this policy while deploying APIs in Flex Gateway.
Installing and configuring REDIS
By default, Flex Gateway will persist data like cache in memory, but if the pod goes down, all this data is lost. Also, this data is not shared among multiple pods.
To address this aspect, we will use REDIS as our shared storage option for our Flex Gateway instances. Using it, cache and rate-limiting policy information will be persisted and shared among pods.
Download the redis-deployment.yaml and redis-config-flex-gw.yaml files and let's apply them to the minikube cluster.
The redis-deployment.yaml file will install REDIS in our cluster and expose it as a service:
% kubectl create namespace redis && kubectl apply -f redis-deployment.yaml
...

% kubectl expose deployment redis \
-n redis --port=6379 --target-port=6379 --type=LoadBalancer
...
We can retrieve the IP assigned to REDIS using:
% kubectl get svc -n redis

...
NAME    TYPE           CLUSTER-IP     EXTERNAL-IP   PORT(S)          AGE
redis   LoadBalancer   10.110.19.35   127.0.0.1     6379:32678/TCP   6s
Update the redis-config-flex-gw.yaml using the Cluster-IP obtained in the command above.
...
redis:
     address: 10.110.19.35:6379
...
Apply the file to configure the Flex Gateway installation to use our REDIS instance:
% kubectl apply -f redis-config-flex-gw.yaml
REDIS is now installed in the cluster and configured to be used by Flex Gateway instances.
You can check more info about this process here: https://docs.mulesoft.com/gateway/latest/flex-conn-shared-storage-config
Wrap-up
This first article focused more on minikube and Flex Gateway installation and configuration. At this stage, we have an operational environment ready to be used to deploy APIs and start some testing.
Stay tuned for the next article, which will focus on API deployment and usage with Flex Gateway. See you soon!!