'We are planning to upgrade to Mule 4 in a few months. Meanwhile, the development is on hold because it is impossible to find any Mule 3 certified resources. Can you help us?' The head of the integration programme was crying for help. Looks like it is a common problem as many organisations still rely heavily on the old Mule 3 version.
So, if you are a Mule 4 certified muley with no previous Mule 3 experience, would you be able to create Mule applications? I faced this challenge while working on a project on Mule 3. In this blog, I want to share my experience and describe a few significant version differences I discovered.
DataWeave 1.0 vs DataWeave 2.0
Let us look at the changes that have occurred in DataWeave. Mule 3 relies on Mule Expression Language (MEL) for evaluating data in properties, variables and payload. While DataWeave 1.0 is used to create messages. There are a variety of evaluators with MEL to handle different inputs, like Groovy and JSON. Users must convert their binary data into Java objects to gain access to that data.
For example, in Mule 3, I had to convert the payload to string in order to print it using Logger. The Transform Message component can only transform input data after it is converted to an object. In Mule 4, everything is much easier. The incoming data is recognised automatically, and therefore, no conversion is required.
While working with Mule 3, be aware that the code syntax differs from Mule 4. I highly recommend the MuleSoft online documentation. You can find everything required to configure different components and understand how specific functions work in DataWeave 1.0. These details are crucial for writing a transformation code for your data.
Error handling
In Mule 3, the error handling is composed of Java exception handling. It does provide information about the details of the error thrown.
There are also five exception strategies:
- Catch exception strategy.
- Choice exception strategy.
- Reference exception strategy.
- Rollback exception strategy.
- Default exception strategy.
In Mule 4, the Java Throwables are still available; however, the error handling mechanism is based on the Mule runtime engine's error. Suppose there is an error thrown in the component. In that case, the information about the error contains the error type and all its essential properties.
There are three error handling strategies available in Mule 4:
- Default error handler,
- On error propagate scope,
- On error continue scope.
In my Mule 3 project, I had to return the error message from the Process API to the System API and include the success response. To achieve it, I first had to get the actual error message from the exception and then apply the Catch exception strategy. In Mule 4, I could only use the On Error Continue error handler.
So, the principle of error handling is very different in Mule 3 and Mule 3. In Mule 3, it is composed of Java Exception Handling, while in Mule 4, error handling is Mule specific. Again, MuleSoft documentation is an excellent source of information, explaining how to start building an error handling strategy for your Mule 3 application.
Message models
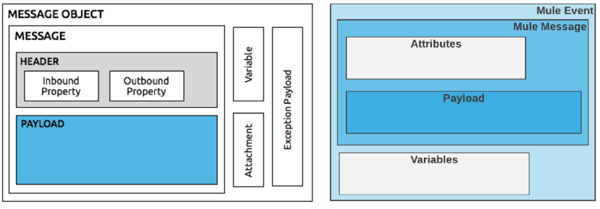
Another difference is related to the model message. In Mule 4, a message consists of attributes, payload and variables. In Mule 3, the message is enclosed in the message object and consists of a header (Inbound and Outbound Properties) and payload. It is definitely more complicated in Mule 3. Because of its complex structure, it is more troublesome to get the required information from the metadata in Mule 3. Note that when building a Mule 3 application, the metadata needed for developing an application might not be stored in one place.

On the left hand side there is Mule event in Mule 3, on the right hand side Mule event in Mule 4
Project structure and Maven
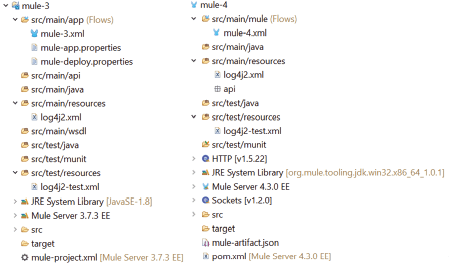
When I realised there was no pom file, I was astonished! In Mule 3, there are two types of projects available: Mule project and MuleSoft application with Maven project. In Mule 4, all projects are mavenized by default. Anypoint Studio, released with Mule 4, has Maven embedded, which is not the case in Mule 3. Furthermore, in Mule 3, an application is a deployable zip package, while in Mule 4, it is a jar file, which can be used for deployment and shared.

On the left, project structure in Mule 3, on the right project structure in Mule 4.
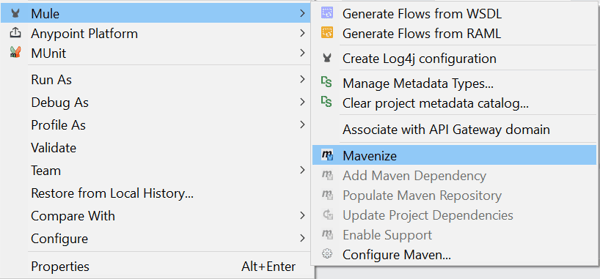
The key thing to remember is that if you want your Mule 3 project to have a pom file, you need to create it yourself. You can mavenize your project by clicking on the name of your project, then go to Mule > Mavenize as on the picture below. The project dependencies will be created for you automatically.

Mavenizing project in Mule 3.
Anypoint Studio
Finally, one of the things that came to my attention in Mule 4 was Anypoint Studio. The flows in Mule 3 are not collapsible, and there is no option to create a favourite palette. The icons of the components are slightly different too. These are just minor changes and not to the point where one would need to learn again how to navigate in Anypoint Studio released with Mule 4.
Conclusion
I admit that it was challenging to adapt to working with Mule 3 and learn these differences between the versions. Developing apps in Mule 3 without a Mule 3 certification would take more time. In my opinion, Mule 4 is more language-agnostic in terms of prerequisites required for the training. Mule 3, on the other hand, seems to be more Java-orientated. However, learning the differences has been a great experience. It was also fascinating to see how much Mule has evolved.
Starting with Mule 3? Check out the Mule 3 documentation. There is plenty of information explaining how to build your apps. I found the included examples about configuring components to be exceptionally helpful. And don't forget the MuleSoft Help forum, where you can find hundreds of questions related to Mule 3 and Mule 4 differences answered by top MuleSoft experts. Good luck!


.png)

