Exposing APIs to our customers and consumers using a vanity domain, like *.acme-apis.com instead of the default domain *.cloudhub.io, is now easier in CloudHub 2.0.
In CloudHub 1.0, this was only possible through Dedicate Load Balancers, and an entitlement (a different subscription) was required to use it. Now, in CloudHub 2.0, this feature is offered by default through the new Ingress Controller without any additional subscription.
Certificate management was also a tedious and annoying task- but not anymore! Let’s explore how we can automate the certificate life cycle and deploy them to CloudHub using ACME.sh and Let’s Encrypt.
ACME.sh & Let's Encrypt
ACME.sh is an open-source, client written, purely in Shell (Unix shell) language that allows you to issue and renew certificates for free. The advantages of this stack are that you don't need to have any dependencies like Python, and it does not require root/sudoer access to run the scripts.
Let's Encrypt is the most famous open certificate authority (CA), providing TLS certificates to over 300 million websites. It provides free and trusted CA certificates, which expire after 90 days. MuleSoft is currently using Let's Encrypt certificates for their default TLS-Context in CloudHub 2.0.
Combining these two amazing stacks, we can automate issuing and renewing certificates using one trusted certificate authority for free. This means we can offer our API consumers a vanity domain, and we don't need to be concerned about the tedious process of managing and renewing certificates.
CloudHub 2.0
CloudHub 2.0 is the biggest update from MuleSoft since the launch of the iPaaS platform more than ten years ago.
Using a Kubernetes-based architecture, we now have the concept of Private Space and an Ingress Controller. These replace the legacy VPC/Dedicated Load Balancer from CloudHub 1.0 and offer load balancer capabilities alongside other features, including TLS management using custom domains.
We can deploy multiple TLS Contexts for each Private Space to store our custom certificate or optionally for mTLS purposes.
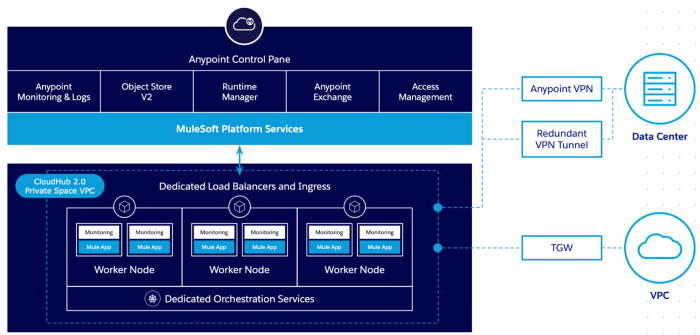
CloudHub V2 — Private Space
As mentioned before, MuleSoft also uses Let's Encrypt in CloudHub 2.0 architecture. Every Private Space has a default TLS Context with a *.cloudhub.io certificate, and the CloudHub infrastructure automatically renews this certificate, so you don't need to do it.
Using ACME.sh script and CloudHub REST APIs, we will also offer the same automation using our custom certificates.
ACME.sh
ACME.sh stack offers multiple customization options, expanding the possibilities of its usage for an infinite range of use cases. Let's take a look at some main capabilities provided by this project:
CA
You can select which CA you would like to use. You can find a complete list of CA supported here.
DNS API
Using the DNS API, ACME.sh connects with your DNS provider through API validating and issues a new certificate automatically. Currently, ACME.sh offers support for most DNS providers. You can check the complete list here.
Deployment Hooks
Deployment hooks are scripts used to automate the certificate deployment to third parties. Once deployed, the same hook will be used during certificate renewal processes, ensuring the automation of all the steps.
I've created a hook called cloudhub-v2, which leverages the CloudHub REST API to deploy the generated certificates into CloudHub 2.0 Private Spaces. To use this script, you will need the following:
-
Connected App: offers the capability to connect to the CloudHub API and create/update TLS Context in the Private Space
-
Organization ID: the Anypoint Platform Organization ID/Business Group ID
-
Private Space ID: the Private Space ID where the TLS Context will be created/updated
Use Case
Now that concept is explained, let's run a use case by creating and deploying a new certificate to the CloudHub 2.0 Private Space.
ACME Corp. is adopting CloudHub 2.0 and wants to expose its APIs using a vanity domain: *.acme-apis.com. Currently, ACME Corp uses Cloudflare as the DNS provider and intends to use Let's Encrypt to facilitate the certificate generation process.
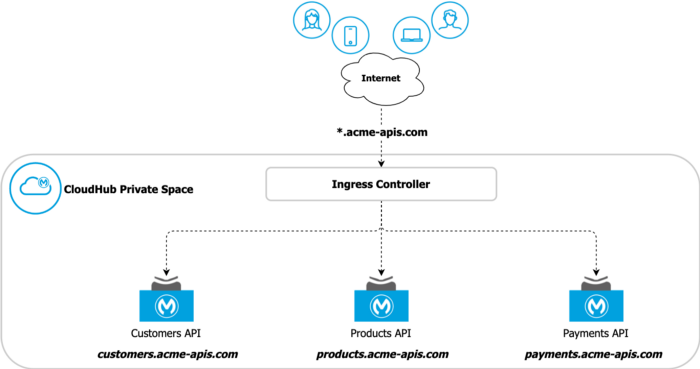
ACME Corp Overview
Configure Cloudflare
Let's start by creating a token to provide access to the Cloudflare API. Since this domain is the only one used by the automation scripts, we will enforce this in Cloudflare, restricting the token access to this domain only.
At Cloudflare, open the API Tokens on your profile page.
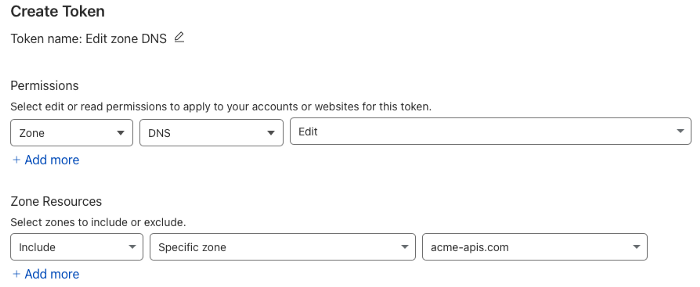
Cloudflare Token
Create a new token using the "Edit zone DNS Template". Select the domain, go to summary, and then click “Create Token”. Copy your token to a safe place. This is very important as it will only appear once.
Configure CloudHub
To access the CloudHub API, we will need to create a Connected App and give some permissions to allow it to access the Private Space and deploy the certificate.
Go to Anypoint Platform in the Access Management navigation menu, and click “Connected Apps”:
-
Click “Create App”
-
Give a name to your app, and in the “Type” field, select “App acts on its own behalf (client credentials)”
-
Add the following scopes to your app: “View Organization” and “Cloudhub Network Administrator”
-
Review the configurations and save your app

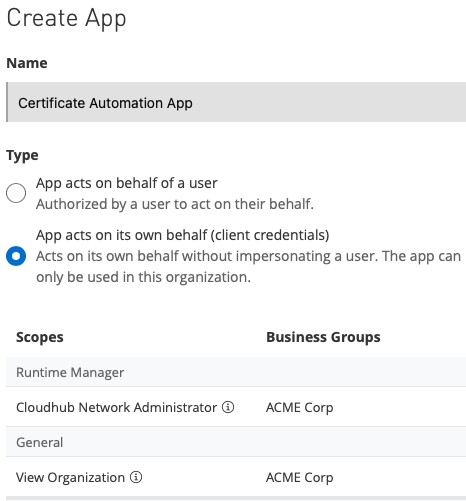
Anypoint Platform Connected App
Copy the Client ID and Secret and store them in a safe place.
Now, let's get the following info to be used by the script:
-
Organization ID: also known as Business Group ID. You can find this info in Access Management → Business Group menu.
-
Private Space ID: you can find this info in the Runtime Manager → Private Spaces menu. Open the Private Space configuration and copy the ID from the URL. (E.g:
Anypoint Management Center )
Copy the Organization ID and Private Space ID and store them safely.
Install & Configure ACME.sh
Follow these instructions to install ACME.sh.
curl https://get.acme.sh | sh -s email=my@example.comDownload and copy the cloudhub-v2 script from this repository to the local ~./acme.sh/deploy folder:
curl https://raw.githubusercontent.com/gui1207/acme.sh/cloudhub-v2/deploy/cloudhub_v2.sh > ~/.acme.sh/deploy/cloudhub_v2.shConfigure your environment by exporting the following variables in your terminal:
export CH2_CLIENT_ID='<Connected App Client ID>'export CH2_CLIENT_SECRET='<Connected App Client ID>'export ORGANIZATION_ID='<Anypoint Platform Organization ID>'export CH2_PRIVATE_SPACE_ID='<Private Space ID where the TLS Context will be created>'This information will be saved in the certificate config file after the first deployment and used during the renewal operations.
Certificate config file name example:
~/.acme.sh/{cert-name}/{cert-name}.confIn this example, we are using Cloudflare as our domain provider, so let's configure the API Token in our environment:
export CF_Token='<Cloudflare API Token>' For other DNS providers, please check this list.
Issue & Deploy the Certificate
With our configurations done, we can now issue and deploy the certificate. Run the following command to issue a SAN or Wildcard certificate:
In this example, we are issuing a Wildcard certificate
acme.sh --issue --dns dns_cf -d '*.acme-apis.com'
Script output - Certificate issued.
acme.sh --deploy -d '*.acme-apis.com' --deploy-hook cloudhub_v2 
Script Output — Certificated deployed.

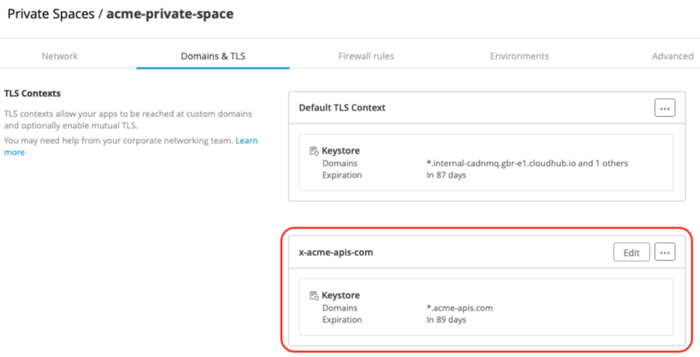
Private Space — new TLS Context for the certificate
The new certificate is now deployed in the Private Space. Before using it, we need to configure our DNS to point to the CloudHub Private Space Domain. This step is done once.
Click on “Edit” in the new TLS Context, and you will see a box with this info:

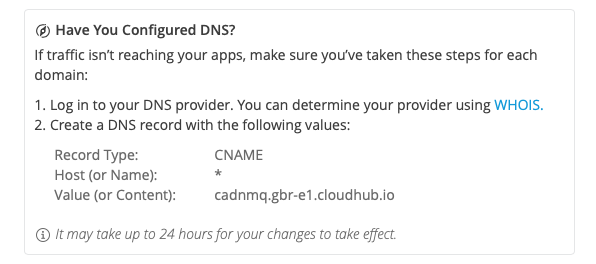
Go to your DNS provider portal and create a CNAME record to point to CloudHub Domain:
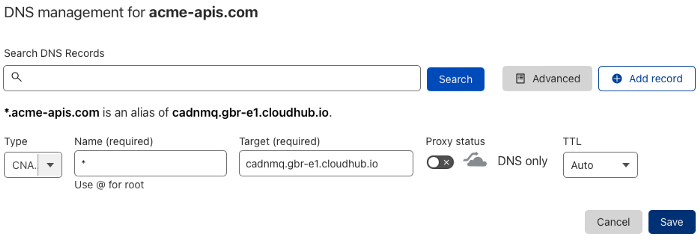
CNAME record
This can range anywhere from taking a few minutes to several hours to propagate, so be patient.
To confirm whether the DNS is propagated, you can use nslookup. In our use case, we have pointed a wildcard domain, so we can test using any subdomain:
nslookup test.acme-apis.com

DNS is propagated — Subdomain pointing to cloudhub.io
Deploying a Test App
Now, let's finally deploy an App and test our new vanity domain on CloudHub 2.0!
Access Runtime Manager and click on “Deploy application”. On Application File, select “Import file from Exchange” and then select the “Hello World” application:


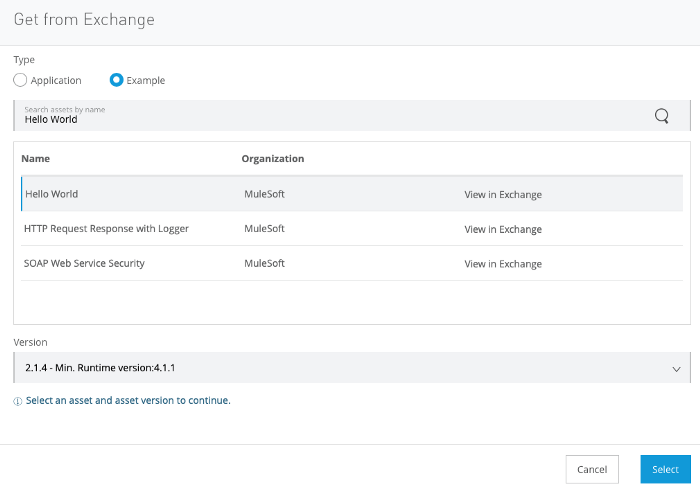
Make sure you are deploying to your new Private Space and in the Ingress tab, click on “Host”, select your new domain. Then, deploy the app.

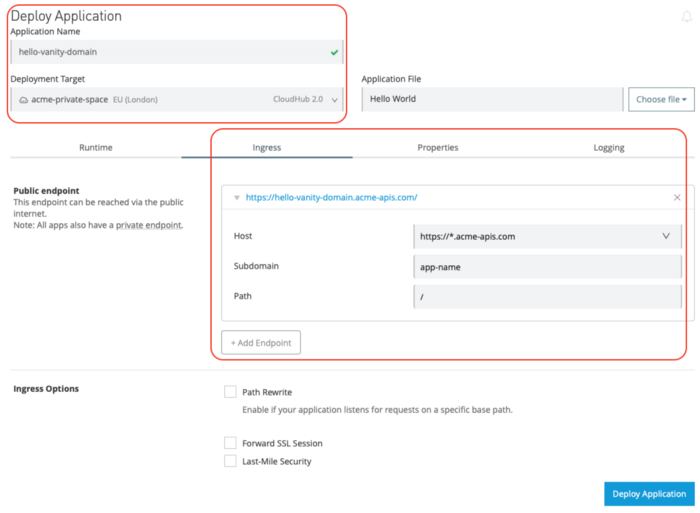
After the deployment, you can check the public endpoint of your new API and test it:


You can check the SSL certificate and chain using online tools like SSL Labs:

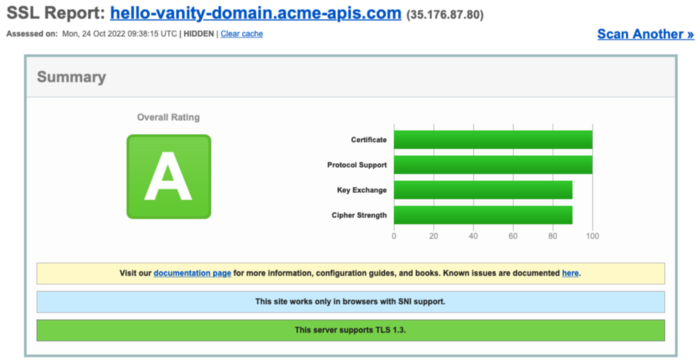
Renewing
ACME.sh creates a daily cron job to check and renew the certificates if needed.
Example checking the cron job created:
crontab -l28 0 * * * “/Users/guilherme/.acme.sh”/acme.sh — cron — home “/Users/guilherme/.acme.sh” > /dev/nullWhile executing this job, the script will try to renew all certificates issued and stored in the certificate folder. By default
~/.acme.sh/{cert-name}/The script will trigger the deployment hook if the certificate is renewed. In our case, the cloudhub-v2 will be executed, deploying the renewed certificate to the Private Space. As mentioned before, the script will use the information stored in the certificate conf file
~/.acme.sh/{cert-name}/{cert-name}.conf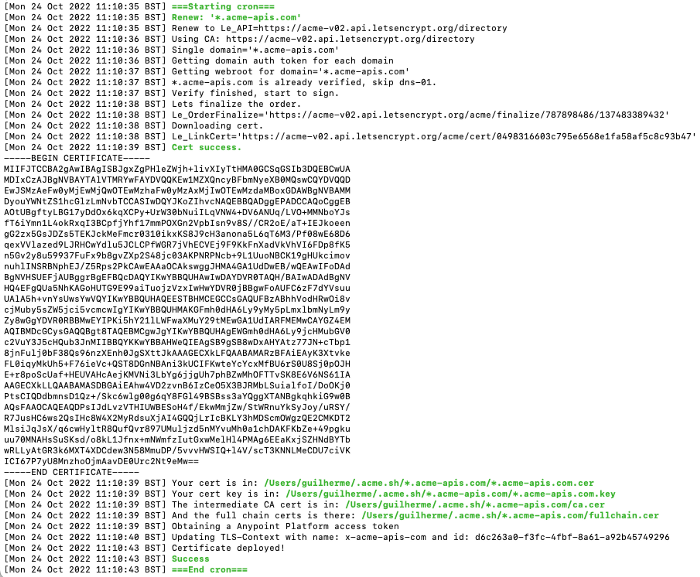 Cron Job Output — Certificate renewed
Final Thoughts
Using the power of ACME.sh, scripts, and the Anypoint Platform REST APIs, we can simply provide custom certificates for our APIs. The entire process is automated, and you no longer need to rely on manual tasks! Plus, you can issue free certificates for your APIs using platforms like Let's Encrypt or ZeroSSL. It's simple, fast, and secure!
Try it and enjoy!
Repositories
ACME.sh official Github: https://github.com/acmesh-official/acme.sh
CloudHub V2 Script: https://github.com/gui1207/acme.sh/blob/cloudhub-v2/deploy/cloudhub_v2.sh
This article was originally published at: https://medium.com/another-integration-blog/automating-certificate-management-on-cloudhub-2-0-d09752ec4720



.png)

