
Here is a challenge for you - how to create an API that retrieves data from a cloud-based system with no external APIs? In the situations like this, it would make a perfect sense to access the data via the system's UI using robotic automation bots. Your API can invoke a bot to read the required information. To implement this solution and enable APIs to Bots requests, we need an API-RPA connector.
We were pleased to hear about MuleSoft and Automation Anywhere (AA) partnership! AA is a provider of a leading RPA and intelligent automation platform. Robotic Automation has been successfully used to automate repetitive manual tasks. It can also complement MuleSoft's API-led integration perfectly. Using APIs and RPA together, we can fully automate business processes even when some of their systems have undeveloped or no APIs! We have a comprehensive post about API-led integration and Robotic Automation and how these technologies go well together.
Mule - Automation Anywhere connector.
Automation Anywhere RPA Bots - Mule 4 connector enabled developers to trigger bots execution directly from MuleSoft Anypoint workflow. The returned data can be extracted, processed and used in integration applications. And the best part is - everything can be done within MuleSoft Anypoint Studio!
In this blog, I'll demonstrate how to:
- set up the API-RPA connector in your Anypoint Studio project,
- call a bot from a sample Mule application,
- receive and retrieve information about the bot's activity,
- test the sample application using Postman to mock a client request.
Every activity I describe in this blog, I've also recorded for you. If you prefer watching to reading, this video will help you to understand how I tested the Automation Anywhere RPA Bots - Mule 4 connector. It's self-explanatory, so the video has no sound.

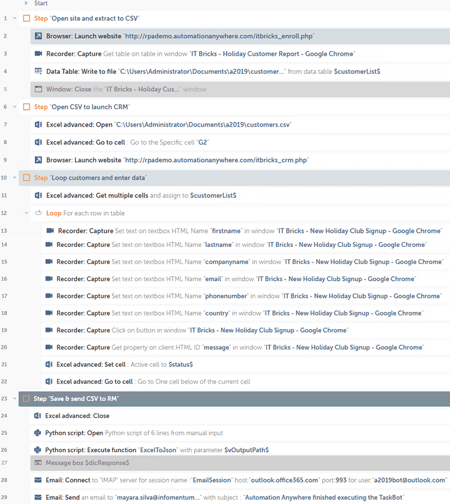
Automation Anywhere bot.
But before we jump into testing the connector, let us talk about the bot that will be called by our sample application. For simplicity of this demo, we're using a bot called 'ITBrick Holiday'. It's a part of the Automation Anywhere training. This bot executes the following task:
- The bot extracts customer data from IT Bricks - Holiday Package Customer Report at http://rpademo.automationanywhere.com/itbricks_enroll.php
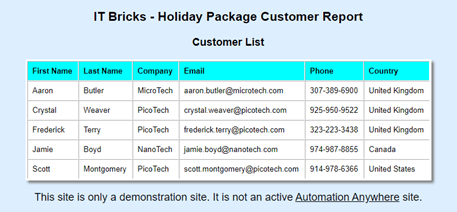
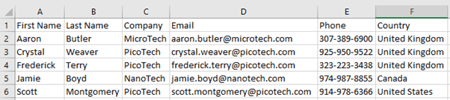
- The bot writes the customer data into a CSV file.
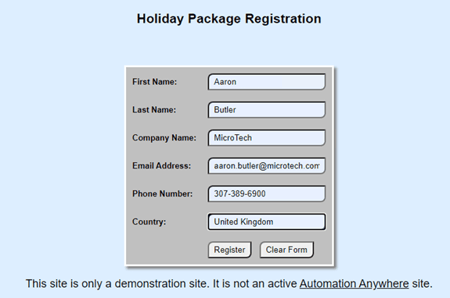
- The bot reads the data from the CSV file and inserts it into the CRM Holiday Package Registration web form on the page: http://rpademo.automationanywhere.com/itbricks_crm.php
- The bot runs a Python command to transform the customer data to JSON format and stores it into a variable of the type string. The $dicResponse$ variable stores the data that will be send back to our MuleSoft application.

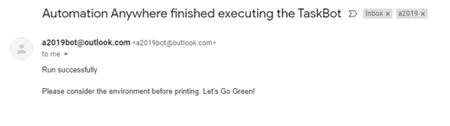
- Finally, the bot informs that the task has been completed by sending an email.
You can see the summary of all tasks executed by our bot while running in the background.
We are now ready to move to our MuleSoft application and explore how to use the API-RPA connector to call the bot and retrieve its status and data.
Set up Automation Anywhere RPA bots – Mule 4 connector.
Automation Anywhere RPA Bots - Mule 4 connector offers the following operations:
- Run Bot Async. Use this option to call a bot asynchronously.
- Get Bot Activity. Use this operation to obtain the bot's status and its progress.
- On Bot Result. It's a listener that handles the HTTP callback response related to the bot's execution state and output.
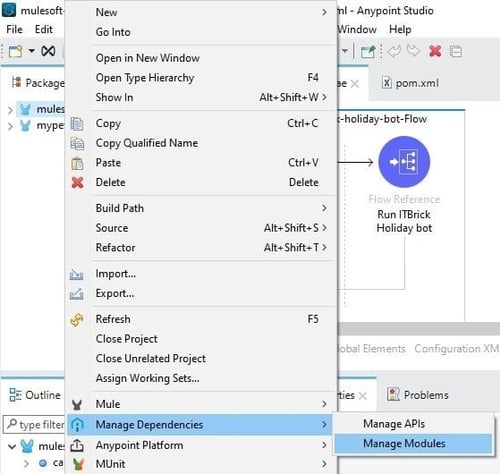
The first thing to do is to add the Automation Anywhere RPA Bots - Mule 4 connector to your project.
- Right-click on the referred project.
- Select Manage dependencies.
- Click on Manage Modules (see the image below). The properties window will be displayed.
- Click on the ' + ' button followed by from Exchange.
- Type 'Automation Anywhere' in the search field.
- Click on the Add button and, finally, select Finish
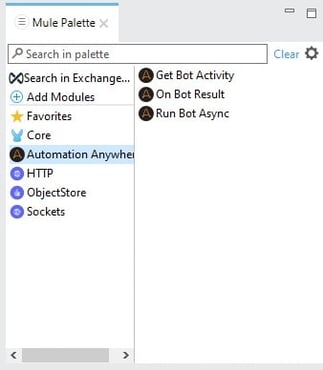
Once you've successfully added the connector, the Mule Palette displays it as shown below:
How to set up Run Bot Async and Get Bot Activity options.
Let me use a sample application to demonstrate how to connect to the Automation Anywhere Control Room. I'll explain how to set up Run Bot Async and Get Bot Activity options to retrieve the bot's execution status.
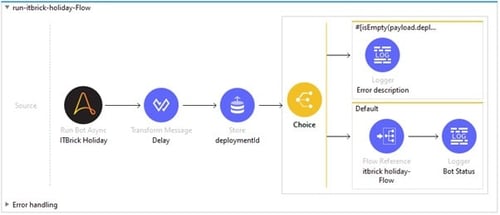
Our sample Mule application comprises 4 MuleSoft Anypoint flows.
The first flow is called 'calling-ITBrick-holiday-bot-Flow'. It has an HTTP listener which triggers our sample application when we call its URL. I use a Postman API client to initiate a call. A flow reference then takes the application to its second flow called 'Run ITbrick Holiday Bot'.
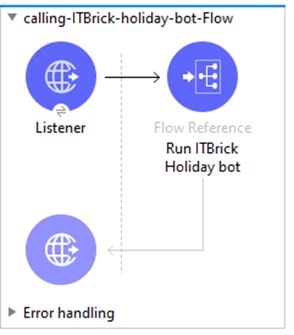
The second flow contains a Run Bot Async option that initiates a call from the Anypoint Studio to Automation Anywhere Control Room where our target-bot resides.
To run the bot, you need to set up Run Bot Async as described below:
- drag & drop Run Bot Async operation,
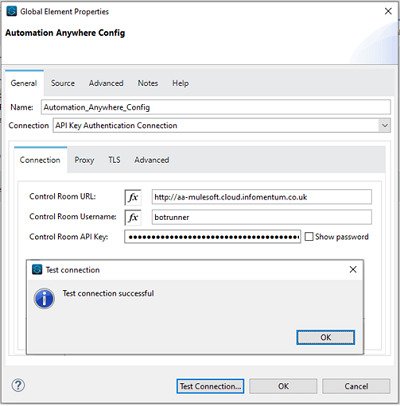
- go to the connector configuration in Basic settings and click '+' button to configure the AA connector on Global Configuration Elements,
- choose the connection that best suits your access to Control Room: API Key Authentication Connection or Basic Authentication Connection,
- fill in the access fields as in our example below.
- to test the connection, click the 'Test connection' button.
- Bot,
- Run As User/Device,
- Device Pool,
- Bot variables (in our test case was set to none),
- Bot Result Key – should be identical to the one we'll set On Bot Result. It is responsible for collecting the bot's data from the callback response from the Automation Anywhere Control Room.
Next, we go to the Advanced tab to configure the callback response. In our case, we chose 'Edit inline' from the callback options and we set as key '__CallbackUrlOverrides__' to hold the app URL value 'http://mulesoft-to-aae.ir-e1.cloudhub.io'. In the end, your configuration should look like in the screenshots below:
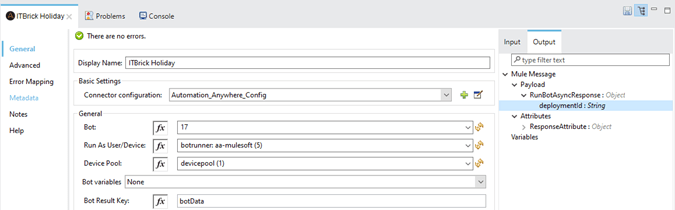 Run Bot Async configuration window – General tab
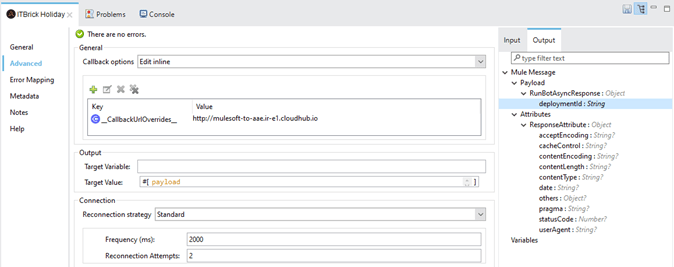 Run Bot Async configuration window – Advanced tab
The Run Bot Async operation launches our test bot and receives its deploymentId (bot's deployment unique identifier) as a part of the response. deploymentId value is used by Get Bot Activity operation. Once Run Bot Async configuration is completed, the current flow proceeds to calling the next flow 'itbrick-holiday-Flow'.
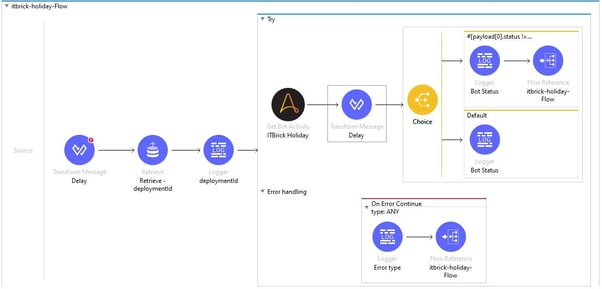
Our third flow 'itbrick-holiday-Flow', deals with Get Bot Activity operation and its response that includes the bot's state, execution progress, status and more. In our example, we expect a response containing the bot's status as it progresses through its execution. The application ends when the 'completed' status is returned.
Now it's time to configure our last Get Bot Activity operation:
- drag and drop Get Bot Activity operation,
- go to the connector's configuration in Basic settings and add the Automation_Anywhere Config we set earlier in the Run Bot Async,
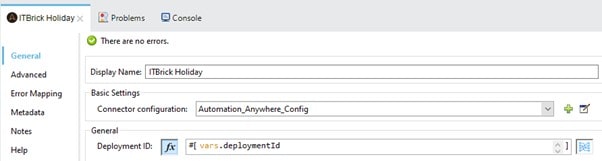
- provide the deploymentId returned by Run Bot Async. In this example, its value is stored in a variable.
 Get Bot Activity configuration window.
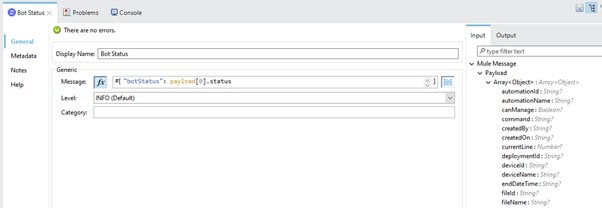
The flow continues executing its logic. The Logger records the response for monitoring and debugging. When execution finishes, the Logger displays the bot's status as shown below.
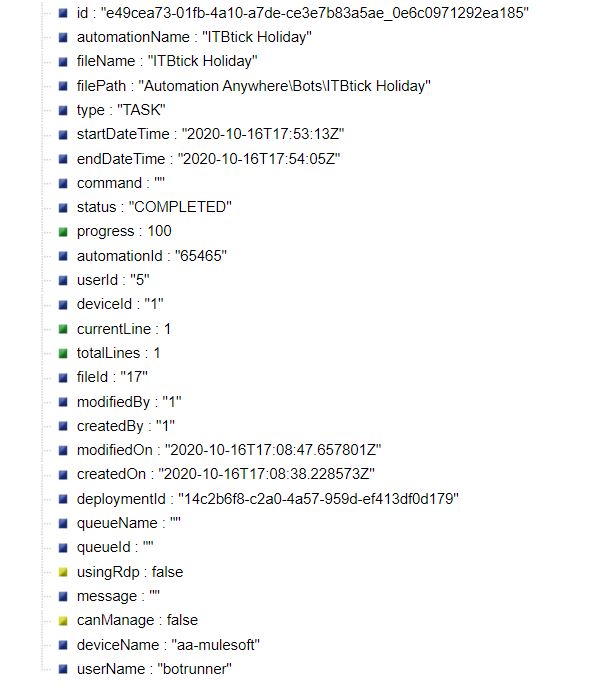
I've also included a sample response (in JSON format) received by the Logger:
Extract bot's data.
Moving to our fourth and last flow, we set up On Bot Result operation to receive the bot's data.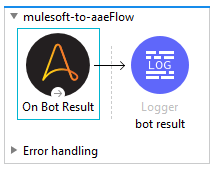
Configure On Bot Result operation by following the steps below:
- Drag and drop On Bot Result operation,
- Go to connector configuration in 'basic settings' and add the Automation_Anywhere_Config we set in the Run Bot Async previously,
- Select the bot as did previously for Run Bot Async,
- Set the Bot Result Key identical to the one set on Run Bot Async,
- Next, go to the Advanced tab and select 'use the bot result key as URL path'.
The configuration should look like the images below:
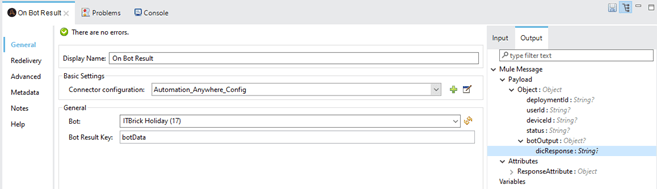 On Bot Result configuration window – General tab
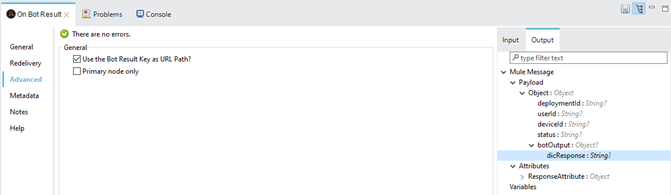 On Bot Result configuration window – Advanced tab
On the upper right of the image above there is the 'Output' tab showing the structure of the Mule message output. The response we are expecting it’s under 'botOutput' in the 'dicResponse' variable.
A sample response received by On Bot Result operation event:
Testing our application
We are finally ready to test our sample application. I use Postman to initiate the call. Then we go back to CloudHub logs to see the bot's progress provided by Get Bot Activity and the bot' data returned by On Bot Result.
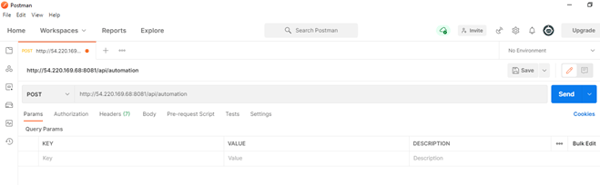 Postman making a request to the Mule sample application.
The CloudHub logs shows the bot's status being returned together with the bot's data.
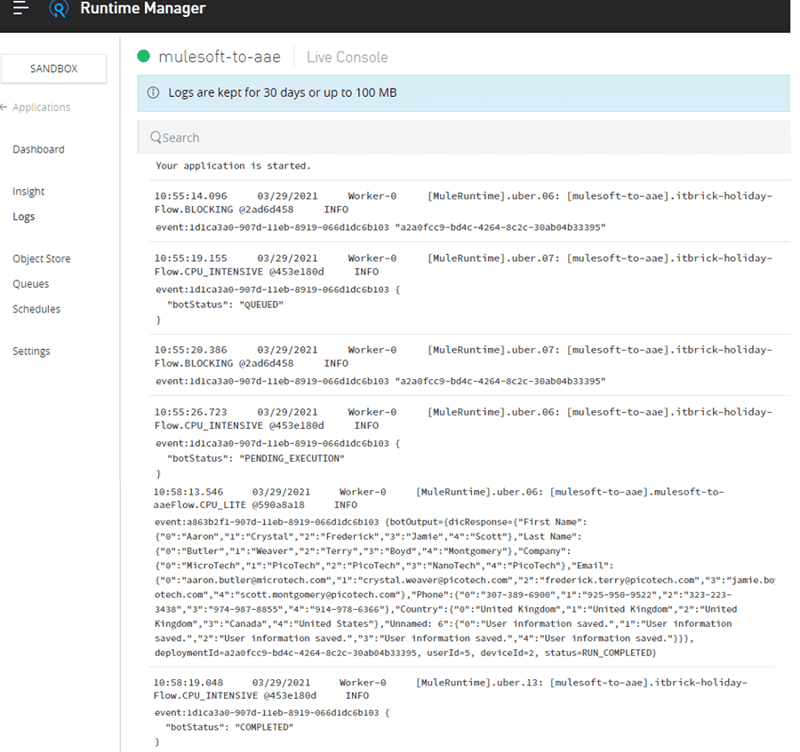 CloudHub log view.
 Response received by the Postman client.
Conclusion
This example demonstrates how easy it is to set up the MuleSoft - Automation Anywhere connector to retrieve information about the bot and the bot's data.
APIs can execute bots to retrieve customer information, invoices, purchase orders, etc from applications that have no APIs for the external communication. For example, imagine you have a bot that registers new customers in your CRM system and this data is required for your Mule application. You just need to set up the Automation Anywhere RPA Bots - Mule 4 connector. And then use the On Bot Result operation to retrieve the information about your new customers.
Have you already implemented the Automation Anywhere RPA Bots - Mule 4 connector? Let me know if you experienced any problems. Or share your cool tips about using APIs and RPA together.
If you are looking for more information about APIs and Robotic Automation check out our recent post - Truth & Myths about APIs and RPA.
Explore how our customers test MuleSoft and Automation Anywhere platforms and their connector during our API & RPA workshop.
.png)
.png)
.png)
