When the connected digital experience has become "a must" rather than "a nice to be", integration solutions are in high demand. APIs are now almost the de factor way for various platforms and systems to communicate and exchange information. So, what happens when a public API fails? In 2014 Gartner estimated it to be about $300,000 per hour!
That's why it's crucial to continuously monitor the APIs you use. API Functional Monitoring health checks your APIs by sending requests to their endpoints and observing the responses. In MuleSoft, you can access the Functional Monitoring section of Anypoint Monitoring from the home page of Anypoint Platform.
You can create tests to verify APIs' endpoints, assertions (for example, a 200 status code), HTTP Headers, etc. The tests can run on a scheduled basis. If there is a failure, you will receive an email notification or set up an alternative way of letting you know about any problems. I highly recommend reading about Functional Monitoring here: API Functional Monitoring in Anypoint Monitoring | MuleSoft Documentation.
In this example, I demonstrate a Functional Monitor created and written in Blackbox Automated Testing (BAT) using the Behavior Driven Development (BDD) language. It runs one assertion against a selected API status endpoint. Our Health Check Status API was created and configured with the policy Client ID Enforcement to expect two headers: client_id and client_secret, with the pair of credentials. We use Anypoint Security Secrets Manager to protect both parameters. To execute our test, we use the BAT command-line interface (CLI).
Follow the steps below to facilitate the installation and configuration. Also, you can find the complete documentation provided in To Install BAT | MuleSoft Documentation.
Download and config BAT
- Download BAT from here, save it locally and unzip.
- In this case, the BAT file was unzipped in C:\bat-wrapper-1.1.14\
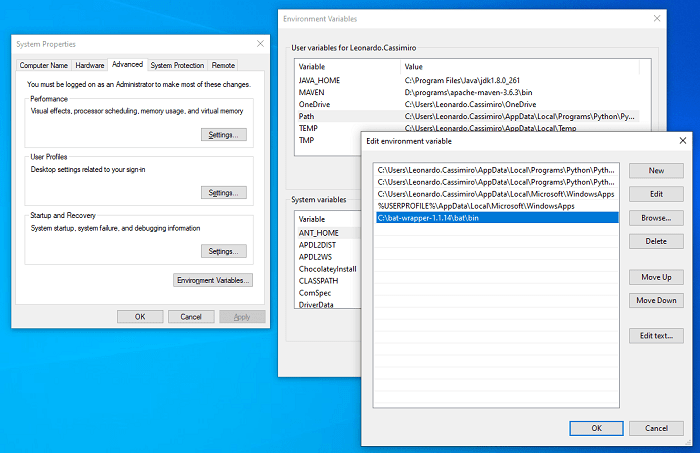
- Add the "bin" path in the Windows variable PATH
Prerequisites for Windows 10 Systems
Install WSL
If you are running Windows 10 version 2004 and higher (Build 19041 and higher) or Windows 11, execute the command below on your CMD/PowerShell (Run as Administrator). More information can be found in Windows 10 version 2004 and higher (Build 19041 and higher) or Windows 11
wsl --install
If running an older build, execute the command below on your CMD/PowerShell (Run as Administrator). More information can be found in Manual installation steps for older versions of WSL
dism.exe /online /enable-feature /featurename:Microsoft-Windows-Subsystem-Linux /all /norestart
Restart your machine after the installation is completed!
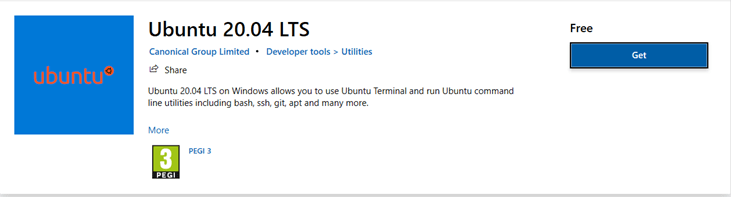
Download and install Ubuntu
Open Microsoft Store, search by Ubuntu and click on the "Get" button to start the download.
After completing the download, install and launch it from Microsoft Store.
Enter the details shown in the example below to create a new user.

 The user has been created successfully.
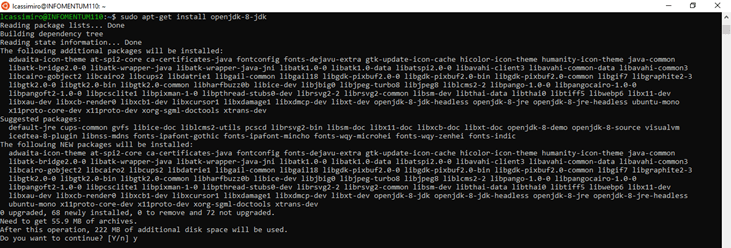
Install Java 8
Run the commands below to install Java 8:
sudo apt-get update
sudo apt-get install openjdk-8-jdk
Enter "Y" to continue the installation.
Install BAT
Run the command below to download the latest BAT version:
bat -version
Secrets Manager
You can access shared secrets in Anypoint Secrets Manager, which enables you to securely store sensitive information, such as a password, authentication token, endpoint URL, etc.
Use the bat grant command to create aliases for your shared secrets. The aliases will be stored in the bat.yaml files in your test suites. During the execution, the BAT CLI can locate the shared secrets through aliases. Read more: Keeping Confidential Information Secure in Tests.
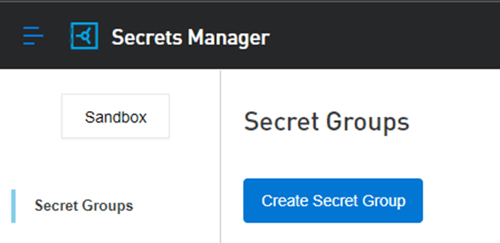
In Anypoint Platform, go to Secrets Manager and select the environment to store the sensitive information.
Click on the "Create Secret Group" button.
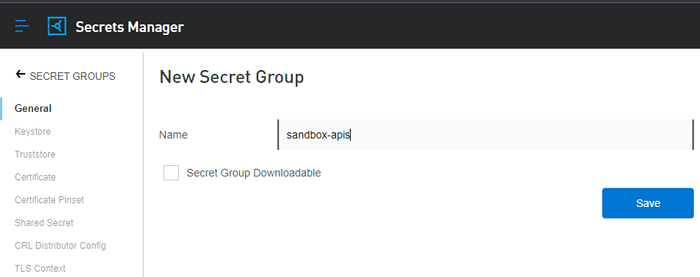
Enter a group name, for example, sandbox-apis and save it.
After the secret group is created, click on the "Shared Secret" menu option, click on "Add Shared Secret" and enter the following values to secure the client_id and client_secret:
Name: Is the alias name
Type: Provide a Base64 string containing a Symmetric key.
Key & confirm Key: Are the secure information in Base64 format.
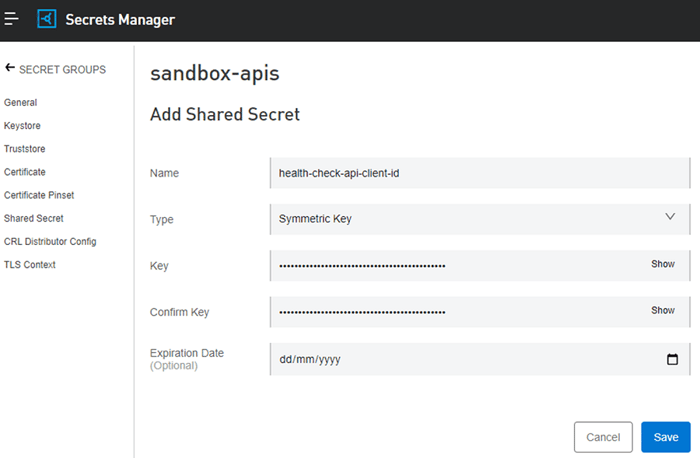 health-check-api-client-id
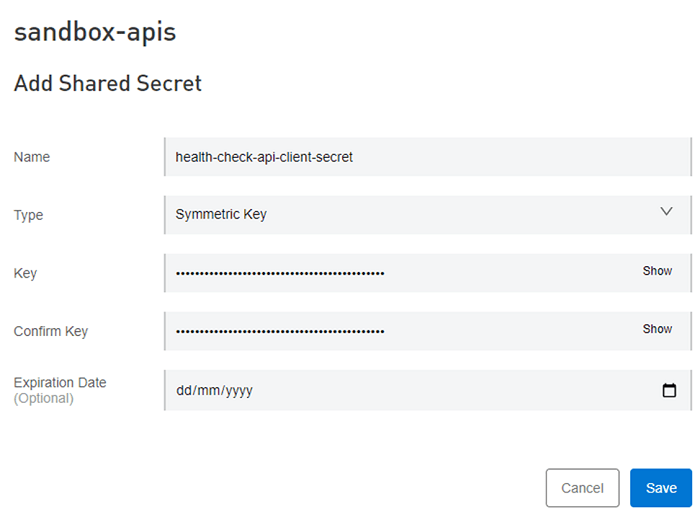 health-check-api-client-secret
Creating Functional Monitoring
Go to Anypoint Monitoring, select "Functional Monitoring" and click on "Create Monitor".

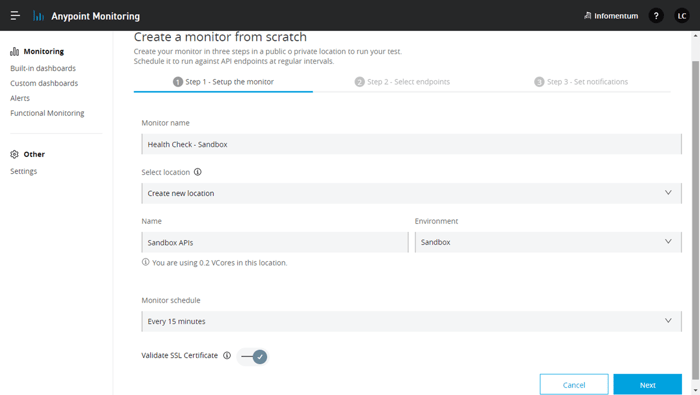
On "Step 1 - Setup the monitor", give the Monitor a name. In the "Select location" field choose the option "Create new location" because the Monitor can only run in a Private Location. Enter a name for this Location and select the Environment.
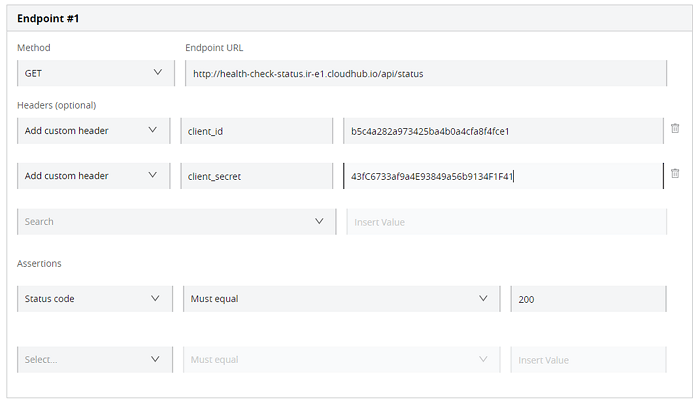
 On "Step 2 - Select endpoints ", enter your application details, such as endpoint URL, client_id and client_secret. Click "Next" to go to "Step 3 - Set notifications "and click "Create Monitor".
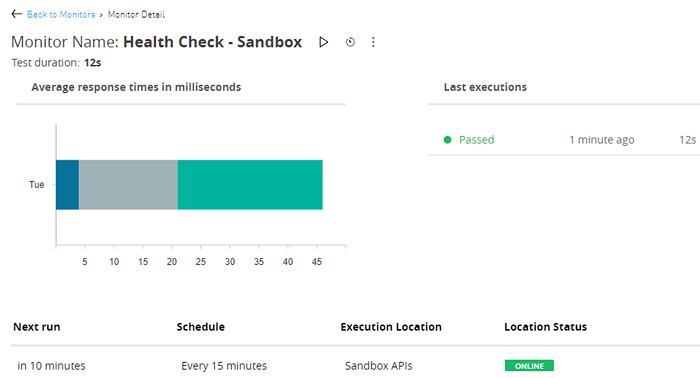
 Monitoring has been created, and the scheduler is triggered. Under "Last executions", click on the "Passed" line to show the test details.
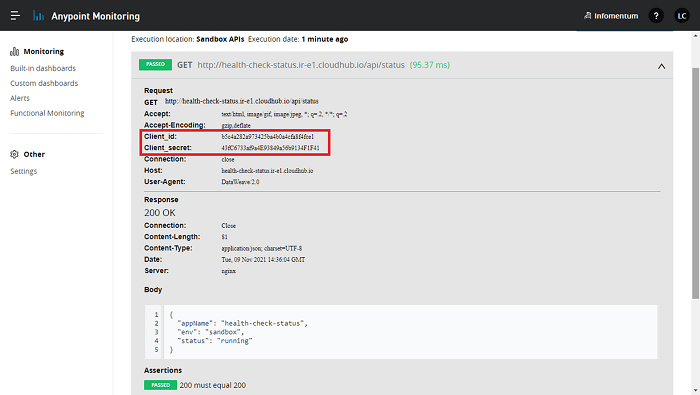
 The status endpoint was called; it returned the body information and status code 200. Note the Client_id and Client_Secret are visible, so the next step is to use the secured information from Secrets Manager.
 Download the Monitor that was created recently.
 You can rename the downloaded zip file to health-check-sandbox_1.0.0.zip.
Running BAT CLI
Open Ubuntu and run the command below to copy the file health-check-sandbox_1.0.0.zip to your user home directory (/home/username).
cp /mnt/c/Documents\ and\ Settings/Leonardo.Cassimiro/Downloads/health-check-sandbox_1.0.0.zip .
Install the unzip utility tool by running the command.
sudo apt install unzip
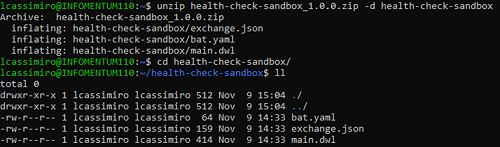
Unzip the file by running the command
unzip health-check-sandbox_1.0.0.zip -d health-check-sandbox
After unzipping, you will note three files on that:
- bat.yaml (describes the structure of your test suite)
- exchange.json (contains the versioning information)
- main.dwl (the test code)
 The first step is to connect to the Anypoint Platform by running the bat command:
bat login --username=<anypoint-platform-username> --host= --environment=sandbox
 Once connected, navigate to the Monitor's folder and run the bat command below to grant the Monitor access to the shared secrets.
bat grant -g=<secrets_manager_group_name> -s=<alias>:<shared_secrets_alias> –forceUpdate
bat grant -g=sandbox-apis -s=client-id:health-check-api-client-id –forceUpdate
bat grant -g=sandbox-apis -s=client-secret:health-check-api-client-secret –forceUpdate
You can also grant access to many shared secrets at once:
bat grant -g=sandbox-apis -s=client-id:health-check-api-client-id,client-secret:health-check-api-client-secret –forceUpdate
As the confirmation of success, you will see the message - Grants successfully generated.
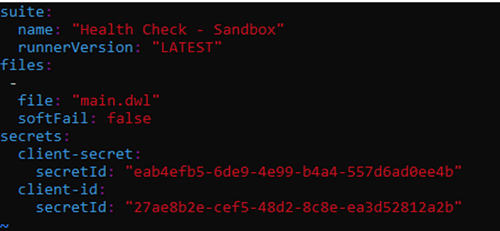
 The bat.yaml has been updated, and the section "secrets" was added to the file.
The client-secret and client-id, are the alias you specified in your grant command, the secretId is the ID of the secret within Anypoint Secrets Manager.
 Update the main.dwl file like the example below:
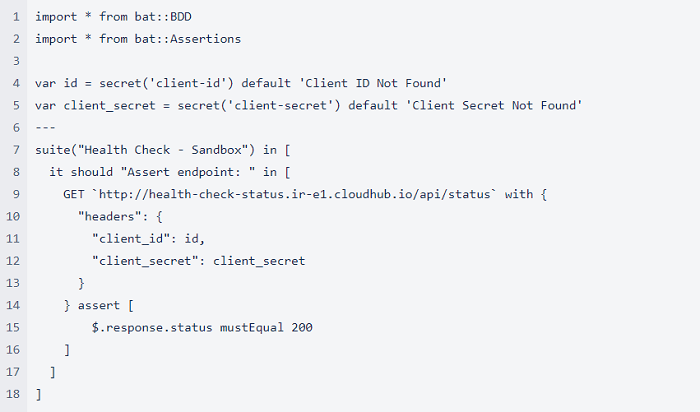 In the example above, the function secret('name-of-the-alias') is called and the secured values are saved in the id and client_secret variables.
In the headers section, you can use the variables id and client_secret to send the masked values.
Upload the Monitor in Functional Monitoring
Run the BAT command line to get the id of the locations.
bat location ls
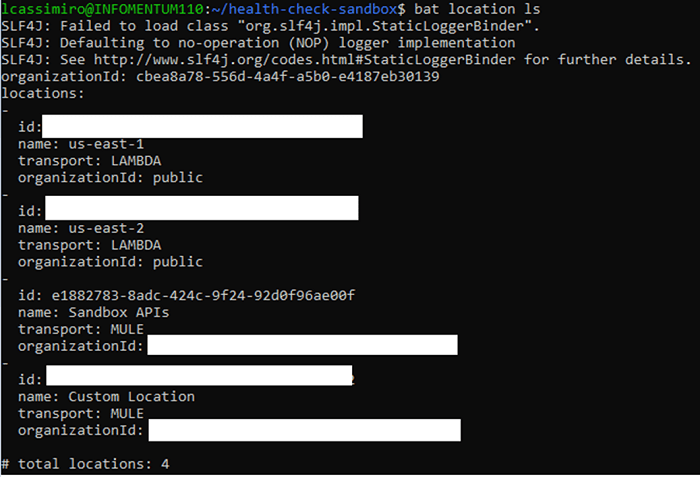
Upload the monitor by running:
bat schedule create --target=e1882783-8adc-424c-9f24-92d0f96ae00f
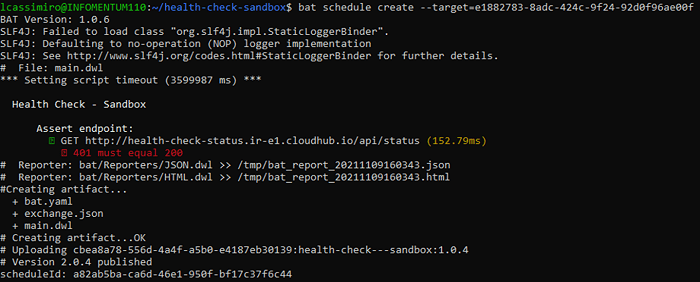 Monitor uploaded
Note: You can also upload the monitor to the Functional Monitoring page of Anypoint Monitoring by clicking on the Upload Monitor option.

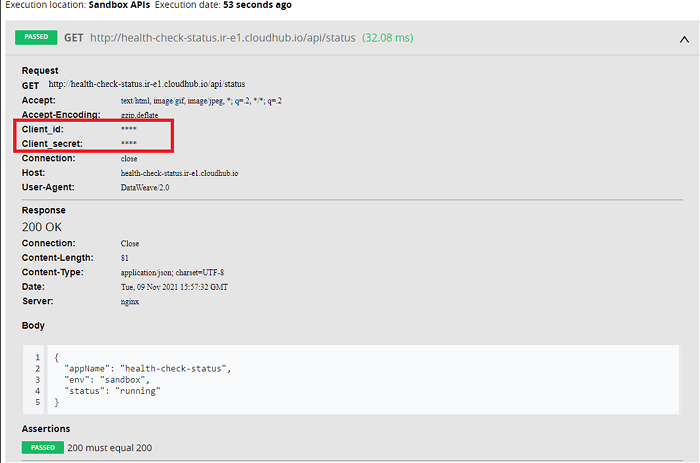
Go to Anypoint Monitoring and under "Last executions", click on the "Passed" line to show the test details. You will see the client_id and client_secrets headers are masked.
To sum up, the API Functional Monitoring option is extremely useful to ensure that APIs are operating and performing as expected. We use assertions as I explained earlier and configure schedules monitors. Continuous testing at regular intervals is particularly crucial in production and non-production environments. Furthermore, you can generate testing reports using tools such as SumoLogic and Slack and share the results of your ongoing testing.
Hope this article was useful for anyone planning to start API monitoring. If you want me to explain the other aspects of API testing, please let me know.
.png)